¶ Modules: ERM
The ERM module is a vital tool for managing various aspects of your organization efficiently. It serves as a central platform to handle organizational details, employee records, customer and vendor relationships, services, and assets.
The ERM module is a vital tool for managing different aspects of your business:
¶ Steps to Access:
Open the ERM Application from your subscribed Pomfret Cloud dashboard.
¶ Steps to Open ERM and Sign In
¶ 🎥 Guide Video
Follow these simple steps to access the ERM Console and sign in.
-
1️⃣ Open the ERM Application
Open your web browser (Chrome recommended).
Enter the ERM Console URL in the address bar and press Enter to load the ERM login page.
-
2️⃣ Enter Your Login Credentials
Locate the fields on the login screen:
- Email / Username
- Password
Type your registered email ID and enter your password correctly.
-
3️⃣ Sign In to Your Account
Click on the Sign In or Login button.
Wait for the system to authenticate your credentials.
-
4️⃣ Successful Login
If details are correct, you will be redirected to the ERM Dashboard.
From here you can access modules like:
- Organization Setup
- Services
- Voyage
- Bookings
- Console Settings
Once logged in, navigate through the following key sections:
Key Sections:
- Organization:
- Create and manage organization details.
- Define company structure and core information.
- Publish organizations to LSPWorld for global visibility.
- Employees:
- Add and manage employee records.
- Assign roles, departments, and access permissions.
- Maintain HR and administrative data.
- Customers:
- Register and track customer information.
- Manage customer interactions and service records.
- Link customers to related shipments or voyages
- Vendors:
- Add vendor profiles and maintain supplier details.
- Track vendor services, contracts, and performance.
- All services:
- Configure and manage all offered services (e.g., Cargo Handling, Ocean Freight, Inland Freight – Container).
- Select at least one mandatory service before publishing your organization.
- Assets:
- Record and manage physical and digital assets.
- Track ownership, usage, and maintenance details.
¶ 1.ERM – ORGANIZATION
¶ 🎥 Guide Video
¶ 1.Create Organization
The organization serves as the backbone of the ERM system, providing the necessary framework and infrastructure for managing various business processes, financial transactions, legal compliance, and relationship management with employees and customers.
The organization sets the structural framework within the ERM system, providing the necessary infrastructure for managing various business processes. It establishes the hierarchy, roles, and relationships within the system.
By creating an organization profile, businesses can centralize and organize essential data, including contact information, financial details, and operational parameters. This facilitates efficient data management and retrieval within the ERM system.
The Create Organization page in the ERM system allows users to register a new organization with complete business, financial, and contact details. This information is used across integrated applications
Establishing and maintaining relationships with employees, customers, and other stakeholders are fundamental to business success. The organization profile allows businesses to manage and track interactions with these stakeholders within the ERM system, facilitating effective relationship management.
¶ Organization Hierarchy Structure
¶ Parent Organization
- Creation: Users must be able to create only one parent organization within the ERM application.
- Function: Serves as the top-level entity from which all other organizations derive.
¶ Subsidiaries
- Creation: Users must be able to create subsidiary organizations under the parent organization.
- Hierarchy:
- Subsidiaries can have their own child subsidiaries and branches.
- A subsidiary can be created under the parent organization or another subsidiary.
- Child Entities: Subsidiaries can have:
- Child subsidiaries
- Branches
¶ Branches
- Creation: Users must be able to create branches under the parent organization or subsidiaries.
- Hierarchy:
- Branches cannot have child subsidiaries.
- Branches cannot have other branches under them.
- Fill Up the Organization Details Form.
- Enter Organization Information.
.png)
This section gathers essential details about your company, including its name, currency, contact information, address, and banking details. It lays the groundwork for establishing your business profile within the ERM system.
- Fill Up the Required Details to Create Your Organization
- After successfully creating the organization, you will see your added organization in the Organization list, where you can view its details.
Below are the details that need to be filled:
¶ Organization
¶ Fields and Descriptions
¶ 1. Organization Details
Organization Name: Enter the legal or business name of the organization.
Organization Type (Multi-select): Select one or more types that represent the organization’s business nature (e.g., NVOCC, Freight Forwarder, Shipping Line, Terminal Operator, Transporter, etc.). (Updated: Multi-select enabled)
Currency (Multi-select): Select one or more currencies the organization operates in. (New Field: Accepted Currencies)
Contact Email: Provide the official contact email address.
Contact No: Enter the organization's landline number.
Mobile No: Enter the mobile contact number for communication.
Website: (Optional) Provide the official website URL.
Organization Address: Enter the complete address, including:
Address Line 1
Address Line 2
Country
State
City
PO Box
¶ 2. Ship Company Details
IMO Company No: Unique identifier assigned by the International Maritime Organization.
Ship Company Role: Specify the organization’s role within the maritime sector (e.g., Owner, Operator, Charterer).
TRN No: Tax Registration Number for taxation identification.
GST / VAT No: Indicates registration under Goods and Services Tax (GST) or Value Added Tax (VAT).
¶ 3. Bank Details
Bank Name: Enter the name of the bank where the account is held.
Holder Name: Name of the account holder.
Account Number: Enter the valid bank account number.
Swift Code (BIC): Identifier for international financial transactions.
IBAN Code: International Bank Account Number (used in specific regions).
Country: Specify the country of the bank.
¶ 4. Organization Image Upload
Image Attachment:
Users can upload an image (e.g., logo or relevant document) for the organization.
The image will be stored in the ad_org table as a Base64-encoded string under the image field.
Supported formats: .jpg, .png, .jpeg
Recommended size: ≤ 2 MB
¶ 5. Actions
Submit:
After filling in all required fields, click Submit to save the organization details.
The record will be created and stored in the database.
View Organization:
Once saved, the organization appears in the list view with options to view, edit, or publish.
¶ 2. Organization Services
Once the organization information filled successfully, the next step is to define and publish the services your organization offers. This ensures accurate visibility and discoverability across the integrated applications within the Pomfret Cloud ecosystem.
.png)
¶ Purpose
The Organization Services section allows users to specify the type of logistics and operational services their company provides — ensuring seamless integration between the organization’s capabilities and other modules like CFLEET, MyCargo, and CFREIGHT.
¶ Steps to Configure Organization Services
- Open the ERM application.
- Navigate to: Organization → List View → Select your Organization.
- Click on: Edit / Publish.
- Scroll to the “Services Offered” section.
- Select the applicable services from the predefined list.
¶ Available Services
Below is the list of services your organization can offer within the ERM system. Each service represents a specific operational capability that helps define your organization’s logistics role in the Pomfret Cloud ecosystem.
Door-to-Door (D2D):
Provides a complete logistics solution from the shipper’s door to the consignee’s door, ensuring end-to-end cargo delivery.
Door-to-Port (D2P):
Covers the pickup of cargo from the shipper’s door and delivery up to the destination port.
Port-to-Door (P2D):
Manages the transportation of goods from the port of origin to the consignee’s final delivery location.
Port-to-Port (P2P):
Facilitates standard freight movement between the origin and destination ports.
Port Services (PS):
Includes operations and services provided within port premises, such as cargo handling, loading, and unloading.
Seafarer Services (SS):
Focuses on crew management, recruitment, and other maritime workforce-related solutions.
Transport Provider (TP):
Offers inland transportation or trucking services for the movement of cargo within or between cities.
Customs Broker (CB):
Handles customs clearance, documentation, and compliance for both import and export shipments.
Warehouse Provider (WP):
Provides warehousing, storage, and distribution facilities for goods at different stages of the logistics chain.
¶ Service Selection and Country Mapping
When a service (e.g., Door-to-Door or Port Services) is selected,
the system will prompt the user to specify the countries where that service is available.
This mapping ensures that the organization’s service visibility is region-specific and accurate.
Example:
If you select Door-to-Port and Port-to-Door services,
the system will prompt:
“Select the countries where your organization offers Door-to-Port and Port-to-Door services.”
¶ Organization Email Verification (ERM Subscription Required)
The OTP-based email verification functionality is available only after the ERM application has been successfully subscribed. Once subscribed, the ERM application allows verification of an organization’s email address at any stage of the organization lifecycle, regardless of its current status. The verification can be performed when the organization is saved as a draft as well as after it is published.
¶ Prerequisites
- Valid username and password
- ERM application subscription enabled
¶ Step-by-Step Process
-
Login to Console Application
- Open the Console application.
- Log in using a valid username and password.
-
Subscribe to ERM Application
- Navigate to the Applications section.
- Subscribe to the ERM application.
-
Login to ERM Application
- After successful subscription, log in to the ERM application using the same credentials.
-
Create Organization
- Click on the Create Organization (+) icon.
- Enter the required organization details:
- Organization name
- Organization type
- Accepted currencies (select from dropdown)
- Current currency
- Contact email ID
- Mobile number
- Contact number
- Upload organization logo
- Enter VAT number
-
Enter Additional Details
- Provide address details
- Enter bank details
- Add services
- Upload required documents
-
Email Verification
- Navigate back to the Organization tab.
- Locate the Contact Email field.
- Click the Verify Email button beside the email field.
-
Send OTP
- A pop-up appears indicating that a One-Time Password (OTP) will be sent to the entered email ID.
- Click Send OTP.
- A message is displayed confirming that the OTP has been successfully sent.
-
Verify OTP
- Six empty input boxes appear for OTP entry.
- Open the registered email inbox.
- Copy the received 6-digit OTP.
- Paste the OTP into the displayed fields.
-
Email Verification Confirmation
- A notification appears at the top-right corner confirming that the email ID is verified.
- A “Verified” label appears:
- Beside the email field
- In the top-right corner of the screen
-
Submit Organization
- After successful email verification, submit the organization details.
¶ Publish The Organization to LSPWorld application
- Once the services are configured:
- Review the entered details and selected services.
- Click Publish to make the organization and its services visible across the connected Pomfret Cloud modules.
- Upon successful publishing, the organization will appear as an active service provider within the system.
¶ 2.EMPLOYEE
¶ Add Employee
After successfully adding an organization in the ERM (Enterprise Resource Management) system, the next step is to add employees. Here's how you can proceed:
- Navigate to the Employee Management Section
- Fill Up the Employee Details Form
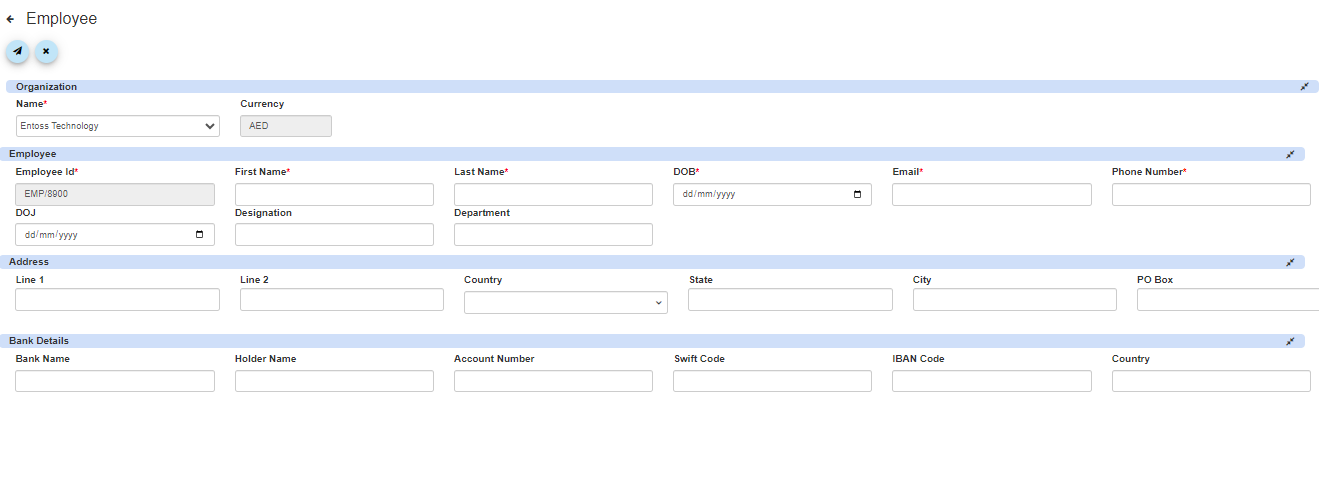
Here, you can organize information about your workforce, such as names, contact details, roles, and potentially payroll-related data. This streamlines workforce management within the system.
This section provides a structured form to input detailed information about each employee. Here's a breakdown of the fields typically included in the form:
¶ Employee
Employee ID: A unique identifier assigned to each employee for tracking purposes within the system.
First Name: The employee's first name.
Last Name: The employee's last name.
Date of Birth (DOB): The employee's date of birth in the format dd/mm/yyyy.
Email: The employee's contact email address.
Phone Number: The employee's primary contact phone number.
Date of Joining (DOJ): The date when the employee joined the organization, formatted as dd/mm/yyyy.
Designation: The employee's job title or role within the organization.
Department: The department or team to which the employee belongs.
¶ Address:
Line 1: The employee's address line 1.
Line 2: The employee's address line 2 (if applicable).
Country: The country where the employee resides.
State: The state or region within the country.
City: The city or locality.
PO Box: The postal code or PO Box number.
¶ Employee Bank Details:
Bank Name: The name of the bank where the employee holds an account.
Holder Name: The name of the account holder.
Account Number: The employee's bank account number.
Swift Code (or BIC): The bank's Swift Code for international transactions.
IBAN Code: The employee's International Bank Account Number (if applicable).
Country: The country where the employee's bank account is located.
Submit: After filling in all the required details for an employee, there would typically be a "Submit" button to save the information and add the employee to the system.
After successfully creating the employee, you will see the added employee in the employee list, where you can view their details.
By collecting and organizing employee information through this form, you can effectively manage your workforce within the ERM system, ensuring accurate payroll processing, efficient communication, and streamlined human resource management processes.
¶ 3.CUSTOMER
¶ Add Customer
Once employees have been successfully added to the ERM (Enterprise Resource Management) system, the subsequent action involves adding customer details. Here's the process to proceed:
¶ Adding Customers to the ERM System
¶ Methods to Add Customers
Bulk Addition:
- Use the "Add Bulk Customer" feature.
- Download the provided template.
- Fill in the customer details in the template.
- Upload the completed template to add multiple customers simultaneously.
Manual Addition:
- Add customers one by one by filling out the Customer Details Form in the system.
- Navigate to the customer Management Section and complete the customer Details Form.
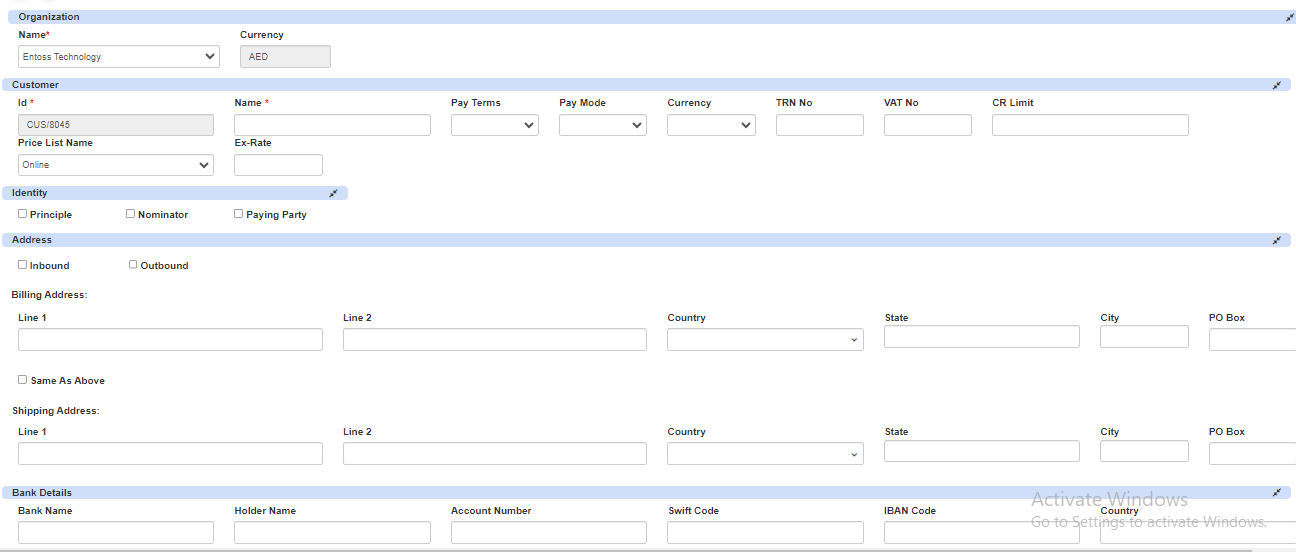
¶ Enter Customer Information:
Customer ID: Assign a unique identifier to the customer within your system.
Name: Enter the name of the customer.
Payment Terms: Specify the payment terms agreed upon with the customer.
Payment Mode: Indicate the preferred payment mode of the customer.
Currency: Select the currency used for transactions with the customer.
TRN No: Tax Registration Number, if applicable.
VAT No: Value Added Tax Number, if applicable.
CR Limit: Credit limit for the customer, if applicable.
Price List Name: Name of the price list associated with the customer.
¶ Identity Information:
Principle: Specify the primary identity associated with the customer.
Nominator: Indicate the nominator of the customer.
Paying Party: Specify the party responsible for payment.
¶ Address Details:
Billing Address: Provide the billing address details including line 1, line 2, country, state, city, and PO Box. You can also specify if the shipping address is the same as the billing address.
Shipping Address: Provide the shipping address details if different from the billing address.
¶ Bank Details:
Bank Name: The name of the bank where the employee holds an account.
Holder Name: The name of the account holder.
Account Number: The employee's bank account number.
Swift Code (or BIC): The bank's Swift Code for international transactions.
IBAN Code: The employee's International Bank Account Number (if applicable).
Country: The country where the employee's bank account is located.
- Submit Customer Information: Once all the required details are filled in accurately, click on the "Submit" or "Save" button to save the customer information in the system.
- After successfully creating the customer, you will see your added employee in the customer list, where you can view your customer details.
Confirmation and Verification:
After submission, the system may provide a confirmation message indicating that the customer has been successfully added.
Review the entered information to ensure accuracy and completeness.
By following these steps, you can effectively add customers to your organization within the ERM system, enabling efficient management of customer relationships and transactions.
¶ 4.VENDOR
¶ Add Vendor
Adding a vendor within the Enterprise Resource Management (ERM) system involves capturing essential information about suppliers or partners with whom your organization conducts business transactions. Here's a brief overview of how to add a vendor:
Navigate to Vendor Management Section: Access the vendor management section within the ERM application. This section is typically found within the procurement or financial management module.
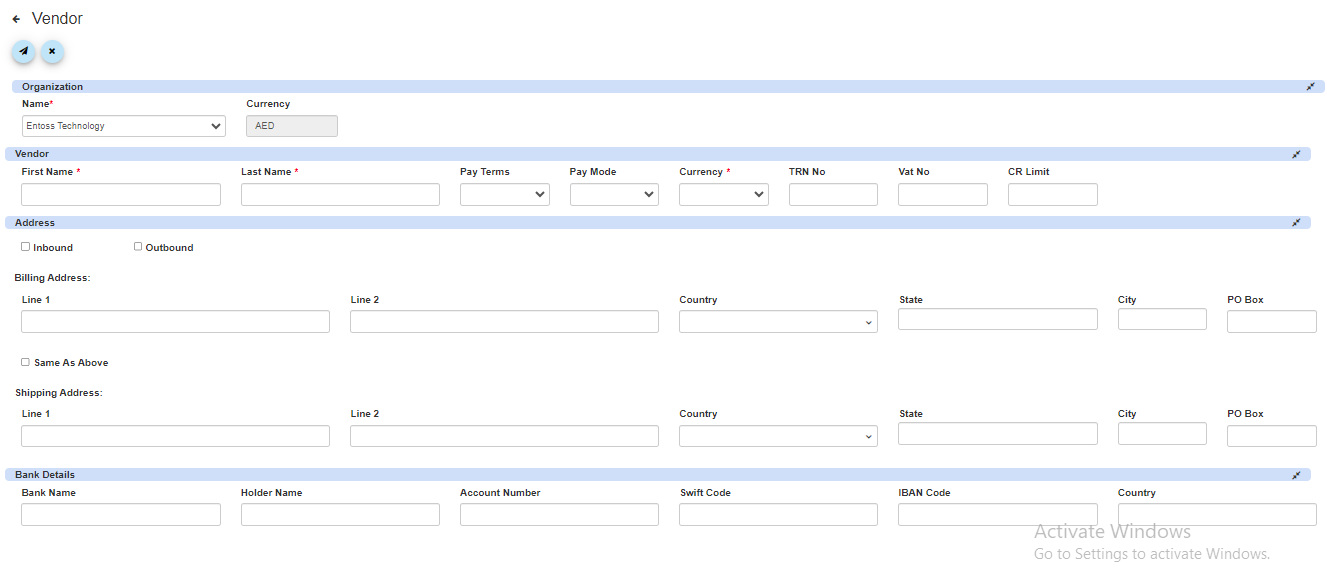
Fill Up the Vendor Details Form: Once in the vendor management section, you'll encounter a form where you can input details about the vendor. This form serves as a repository for vendor information and facilitates smooth communication and transactional processes.
¶ Enter Vendor Information:
- First Name: Enter the vendor's first name.
- Last Name: Enter the vendor's last name (if applicable).
- Payment Terms: Specify the agreed-upon terms for payment with the vendor.
- Payment Mode: Indicate the preferred mode of payment for transactions with the vendor.
- Currency: Select the currency used for transactions with the vendor.
- TRN No: Tax Registration Number, if applicable for the vendor.
- VAT No: Value Added Tax Number, if applicable for the vendor.
- CR Limit: Credit limit for the vendor, if applicable.
¶ Address Details:
- Billing Address: Line 1, Line 2, Country, State, City, PO Box.
- Shipping Address: Line 1, Line 2, Country, State, City, PO Box. (If different from billing address)
¶ Bank Details:
- Bank Name: The name of the vendor's bank.
- Holder Name: The name of the account holder.
- Account Number: The vendor's bank account number.
- Swift Code (or BIC): The bank's Swift Code for international transactions.
- IBAN Code: The vendor's International Bank Account Number (if applicable).
- Country: The country where the vendor's bank account is located.
Submit Vendor Information: Once all required details are filled in accurately, click on the "Submit" or "Save" button to save the vendor information in the system.
After successfully creating the vendor, you will see your added vendor in the vendor list, where you can view your vendor details.
By adding vendors to your organization within the ERM system, you can effectively manage supplier relationships, streamline procurement processes, and ensure smooth financial transactions.
¶ 4.ALL SERVICES
¶ (i)Add Service
In the ERM module, the "Service" component typically refers to the management and optimization of services offered by the organization. Essentially, it's about ensuring that services meet or exceed customer expectations while maximizing efficiency and profitability for the organization.
¶ Adding Services to the ERM System
¶ Methods to Add Services
Bulk Addition:
- Use the "Add Bulk Service" feature.
- Download the provided template.
- Fill in the service details in the template.
- Upload the completed template to add multiple services simultaneously.
Manual Addition:
- Add services one by one by filling out the Service Details Form in the system.
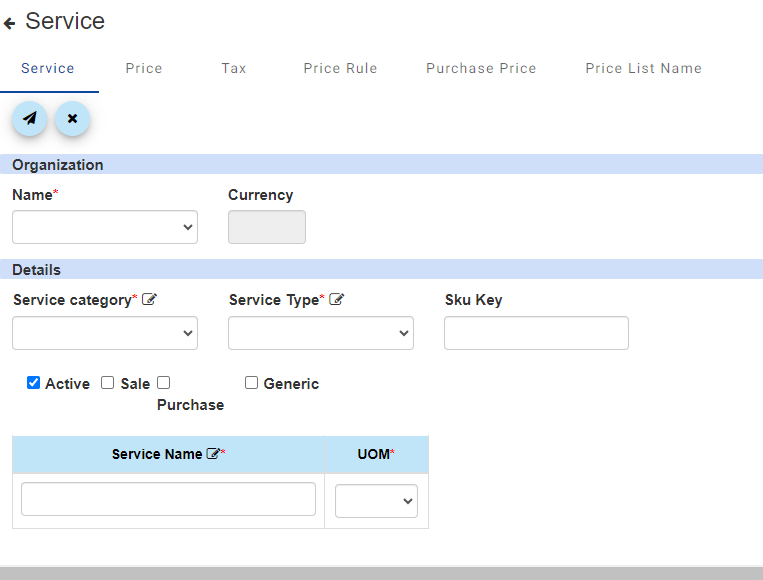
- Service Category: Categorization of the service offered by the organization. This helps in organizing and classifying different types of services for better management and analysis.
- Service Type: Specifies the type or nature of the service provided, such as consulting, maintenance, support, etc. This helps in understanding the specific purpose or function of the service.
- SKU Key: Stock Keeping Unit (SKU) key uniquely identifies the service within the system. It's used for inventory management, tracking, and referencing purposes.
- Active: Indicates whether the service is currently active or not. This flag helps in managing and filtering active services from inactive ones within the system.
- Sale: Indicates if the service is available for sale to customers. This flag is useful for sales and revenue tracking purposes.
- Purchase: Indicates if the service can be purchased by the organization for internal use or resale. This flag is relevant for procurement and inventory management.
- Generic: Specifies if the service is generic or specific. A generic service may have broader applicability, while a specific service may be tailored to meet particular requirements.
- Service Name: The name or title of the service offered by the organization. It should be descriptive and easy to understand for internal and external stakeholders.
- UOM (Unit of Measure): Specifies the unit of measure for the service, such as kilograms (KG), hours, pieces, etc. This helps in quantifying and pricing the service accurately.
¶ Service Price:
To add pricing related to a service in the ERM portal, start by selecting a price list from the "Price List Name" dropdown. The "Default Pricing" option is the default price list, and it is required to have at least one entry with this default list to create a service. After selecting the price list, enter the quantity and provide the respective price in the "Inbound Price" and/or "Outbound Price" fields. If you're setting up simple pricing, you only need to fill in the necessary details under "Price List Name," "Quantity," and "Price." However, if you’re using complex pricing, set the simple pricing values to zero under the default price list. Following these steps will ensure the pricing details are correctly added for each service.
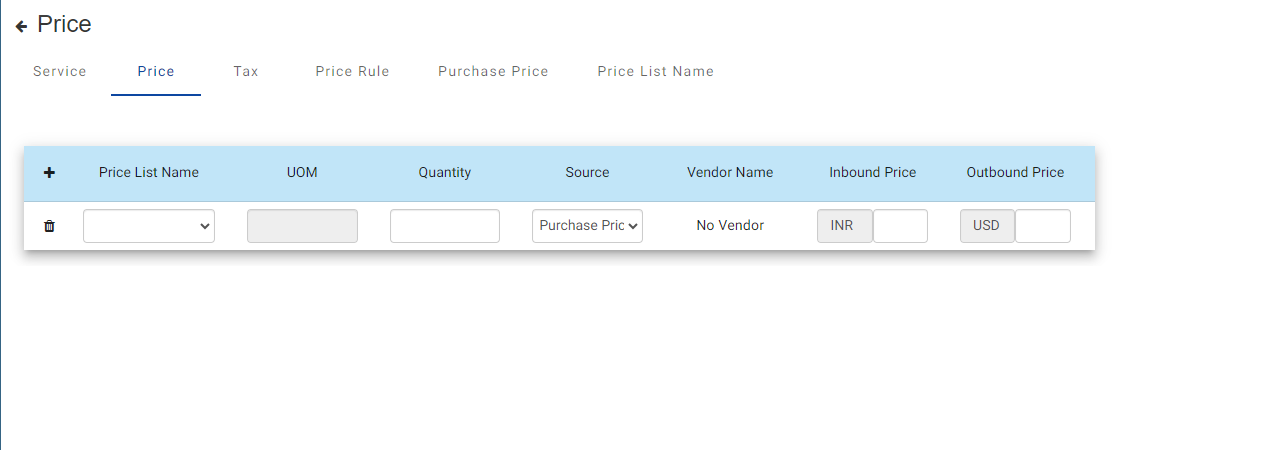
- Price List Name: Enter the name of the price list associated with the service.
- UOM: Specify the Unit of Measure for the service (e.g., hours, pieces).
- Quantity: Enter the quantity of the service.
- Source: Specify the source of the service.
- Vendor Name: Enter the name of the vendor providing the service.
- Inbound Price: Specify the inbound price (cost) of the service.
- Outbound Price: Specify the outbound price (selling price) of the service.
¶ Service Price Rule:
The Price Rule section allows you to configure complex slab-based pricing for services. To set up these rules, start by selecting the Currency for the pricing. Next, specify the Quantity Upto and Amount Upto fields, which define the range for which this price rule will apply. You can then set either a Variable Price or a Fixed Amount based on your pricing structure. Additionally, you can specify the Rule Type and, if needed, add a Percentage for any discounts. This section is intended for cases where more advanced, flexible pricing structures are required beyond simple pricing.
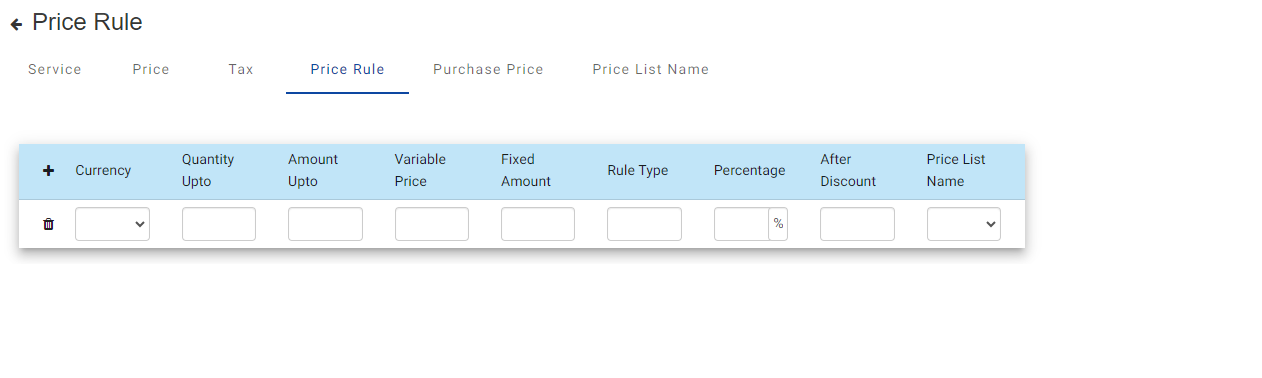
- Currency: Select the currency.
- Quantity Upto: Define the quantity limit.
- Amount Upto: Define the amount limit.
- Variable Price: Indicate if the price is variable.
- Fixed Amount: Specify the fixed amount.
- Rule Type: Choose the pricing rule type.
- Percentage: Specify the percentage (if applicable).
- After Discount: Indicate if the price is after discount.
- Price List Name: Enter the associated price list name.
¶ Service Purchase Price:
The Purchase Price section is used when making port payments on behalf of a PDA. To complete this section, start by selecting the Vendor from the dropdown list. Then, specify the Unit of Measure (UOM), Quantity, and Currency. Enter the Price for the service, and, if applicable, add a Markup to reflect any additional charges. Choose the Markup Type as either Percent or Absolute (Abs) to indicate how the markup should be calculated. The Sales Price field will automatically calculate based on these inputs, providing the final amount to be paid.
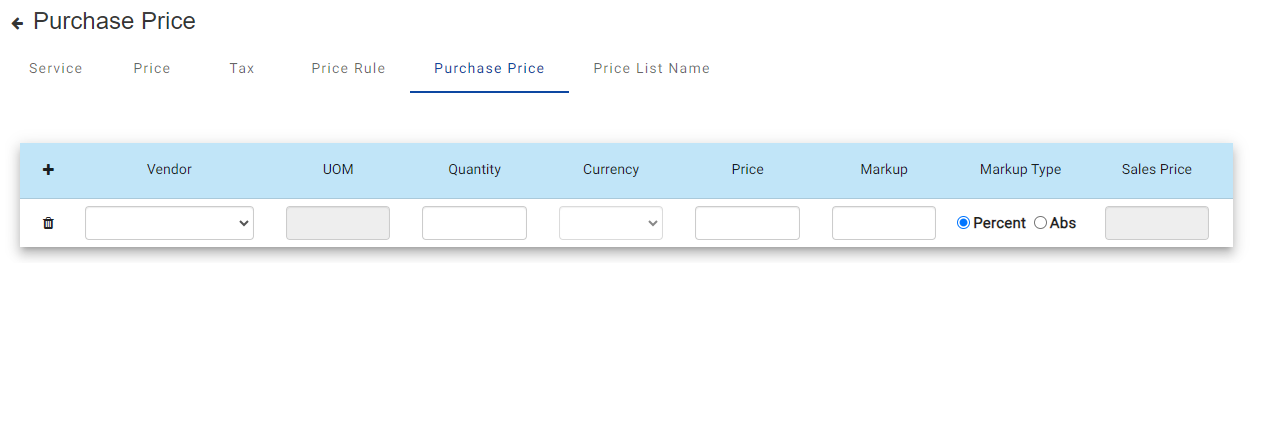
- Vendor: Specify the vendor providing the service.
- UOM (Unit of Measure): Define the unit of measure.
- Quantity: Enter the quantity.
- Currency: Select the currency.
- Price: Enter the base price.
- Markup: Specify the markup amount.
- Markup Type: Choose the markup type (percentage or fixed amount).
- Sales Price: Enter the final sales price after applying markup.
Price List Name: Enter the name of the price list.
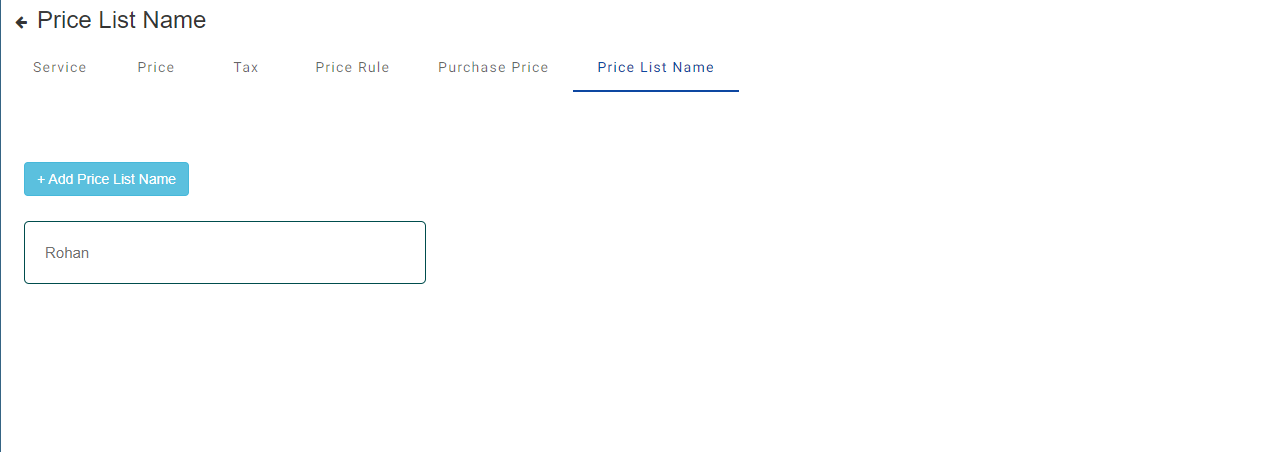
- This name can be used to reference the price list wherever you need to apply pricing rules across various sections of the ERM system.
After entering all the necessary details accurately, you can proceed by clicking on the "Submit" or "Save" button. This action will save the service information in the system.
Once the service is successfully added, you'll be able to view it in the service list, where you can access its details and manage it further as needed.
¶ Assets
The "Assets" section typically refers to a component where an organization can manage its tangible and intangible assets.
Within this section, it's common to find features related to containers and vessels if the organization deals with transportation, logistics, or maritime activities.
Here's a breakdown of what these features might entail:
- Containers Management: This feature allows organizations to track, manage, and optimize the usage of shipping containers.
- Vessel Management: This feature focuses on managing vessels such as ships, boats, or other watercraft.
¶ CONTAINER
¶ Add Container
Containers Management: This feature allows organizations to track, manage, and optimize the usage of shipping containers. It may include functionalities such as:
- Container tracking: Tracking the location and status of containers in transit.
- Container utilization: Monitoring how efficiently containers are being used and identifying opportunities for optimization.
- Maintenance scheduling: Scheduling maintenance tasks for containers to ensure they remain in good condition.
- Inventory management: Managing the inventory of containers, including procurement, deployment, and retirement.
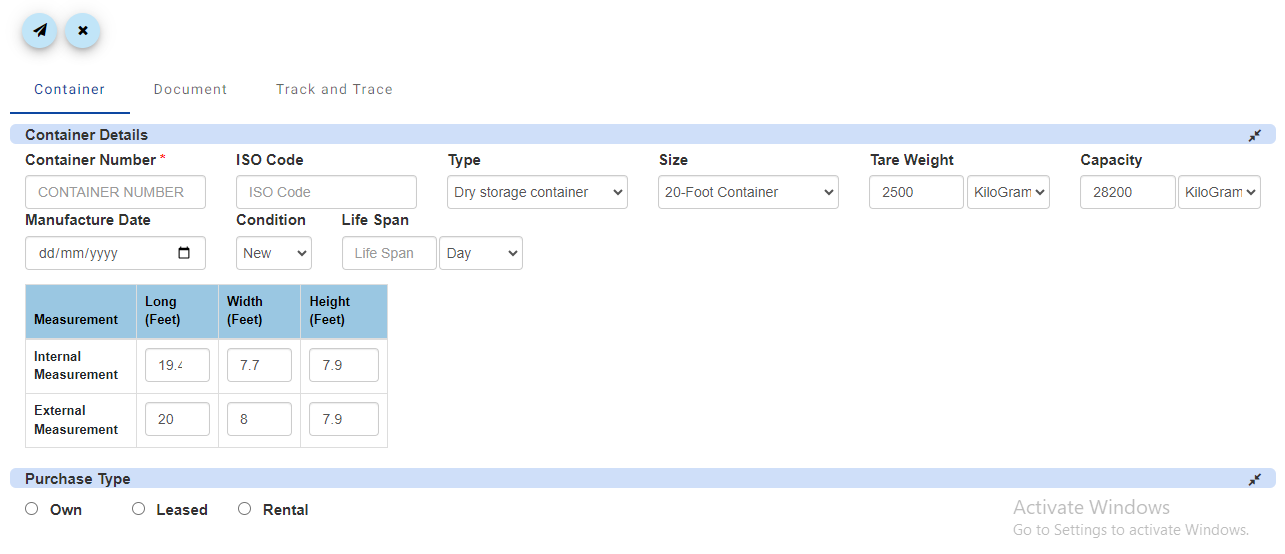
¶ Container Details -
- Container Number: This is a unique identifier assigned to the container for tracking and logistical purposes.
- ISO Code: This refers to the International Organization for Standardization (ISO) code, which sets the standards for containers used in intermodal freight transport.
- Type: This specifies the type of container. In this case, it's described as a "Dry storage container," indicating that it's designed for transporting dry goods and is weatherproof but not insulated or refrigerated.
- Size: This indicates the dimensions of the container. A "20-Foot Container" refers to the length of the container, which is 20 feet. Standard container sizes are typically 20 feet or 40 feet in length.
- Tare Weight: Tare weight refers to the weight of an empty container. It is used to calculate the net weight of cargo by subtracting the tare weight from the gross weight (weight of the container with cargo).
- Maximum Capacity: This specifies the maximum weight that the container can hold, including both the weight of the cargo and the container itself. It helps ensure that the container is not overloaded, which could be unsafe or result in additional costs.
- Manufacture Date: This is the date when the container was manufactured. It provides information about the age of the container, which can be important for maintenance and inspection purposes.
- Condition: This indicates the current condition of the container. In this case, it's described as "New," meaning the container is in brand-new condition and has not been used previously.
- Life Span: This refers to the expected lifespan of the container, measured in days. It provides an estimate of how long the container is expected to remain in service before it needs to be replaced or retired due to wear and tear or regulatory requirements.
- Measurement - Measurements of the container are provided in both internal and external dimensions, which are important for determining how much cargo can be loaded inside and where the container itself can be physically accommodated (like on ships, trucks, and in storage facilities).
- Internal Measurement -
- Long (Feet): This is the internal length of the container. It indicates how much linear space is available for storing goods inside the container.
- Width (Feet): This is the internal width. Along with the length, it helps to determine the floor area available inside the container for cargo.
- Height (Feet): This is the internal height from the floor to the ceiling, determining the vertical space available for stacking goods.
- External Measurement -
- Long (Feet): This represents the total external length of the container, crucial for logistics and planning when fitting the container in cargo holds, trucks, or trains.
- Width (Feet): The total external width of the container affects how containers align and stack on transport vehicles and storage areas.
- Height (Feet): External height is consistent with the internal height, indicating no extra top structure beyond the frame.
¶ Purchase Type -
This field provides options for how the container can be acquired or utilized, based on the needs and financial strategies of the user.
- Own: Checking this option means purchasing the container outright. Ownership is beneficial for long-term usage where the cost of renting would exceed the purchase price, or when modifications or customizations are needed.
- Leased: This option refers to having the container on a lease agreement. Leasing can be more flexible than owning and may include maintenance or replacement options, useful for short to medium-term needs without requiring full investment.
- Rental: Renting a container is typically for the shortest term use among the three options. It is ideal for temporary or one-time needs, such as for a specific project or a seasonal increase in cargo. Renting often involves lower upfront costs and alleviates the owner from long-term maintenance or depreciation concerns.
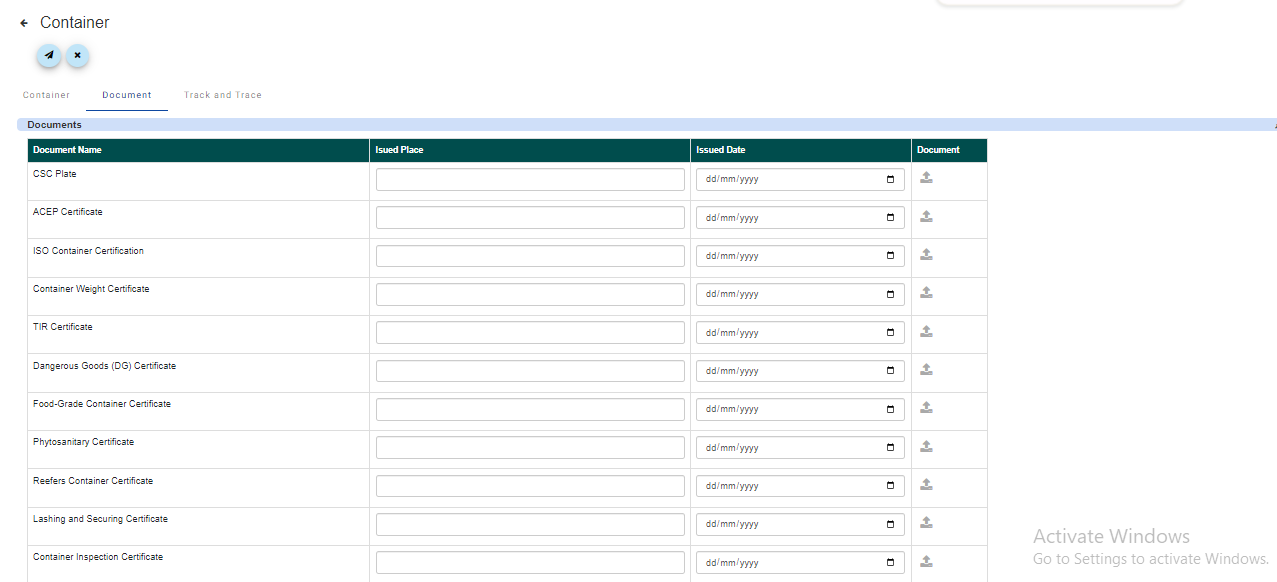
¶ Documents Section Fields
Document Name: Enter the name of the document or certificate related to the container. Common document names include:
- CSC Plate
- ACEP Certificate
- ISO Container Certification
- Container Weight Certificate
- TIR Certificate
- Dangerous Goods (DG) Certificate
- Food-Grade Container Certificate
- Phytosanitary Certificate
- Reefers Container Certificate
- Lashing and Securing Certificate
- Container Inspection Certificate
Issued Place: Specify the place where the document was issued.
Issued Date: Provide the date when the document was issued in the format dd/mm/yyyy.
Document: Attach or upload the actual document file if required.
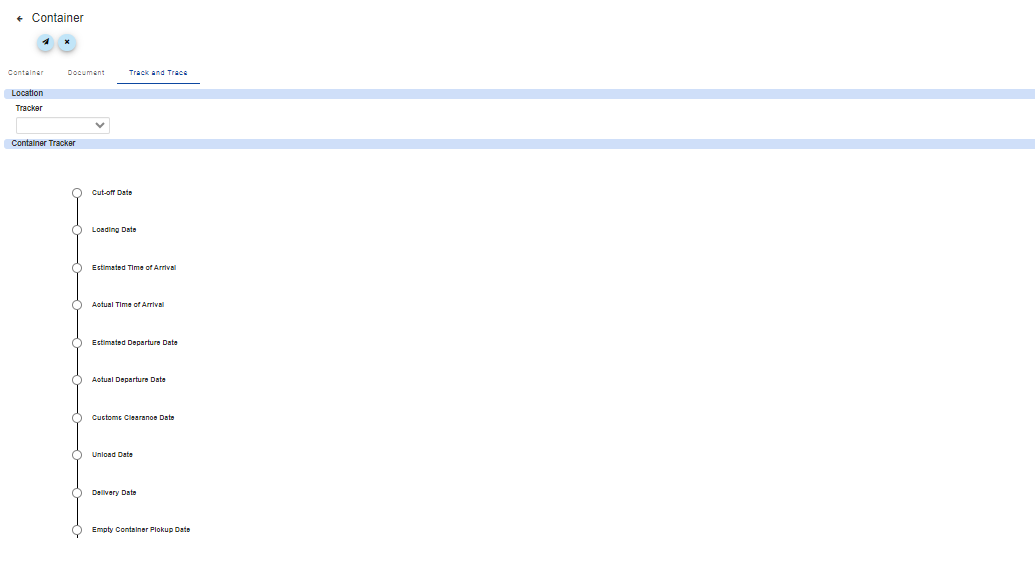
¶ Track and Trace for Container Management
¶ Overview:
The "Track and Trace" feature enables real-time monitoring and tracking of container movements from origin to destination.
¶ Key Elements:
Location: Indicates the current whereabouts of the container, providing visibility into its position at any given time.
Tracker Type & Container Tracker: Specifies the type of tracking technology used (e.g., GPS, RFID) and includes details of the specific tracking device attached to the container.
Important Dates:
- Cut-off Date: Deadline for container loading.
- Loading Date: Date when the container is loaded onto a transport vehicle.
- Estimated Time of Arrival (ETA): Predicted arrival date and time at the destination.
- Actual Time of Arrival (ATA): Actual arrival date and time.
- Estimated Departure Date: Anticipated date of container departure.
- Actual Departure Date: Real departure date.
- Customs Clearance Date: Date when customs clearance procedures are completed.
- Unload Date: Date when the container is unloaded at its destination.
- Delivery Date: Date when the container is delivered to the recipient.
- Empty Container Pickup Date: Date when the empty container is picked up for return or reuse.
Once all details are entered accurately, click on the "Submit" or "Save" button to save the container information in the system.
After successfully adding the container, you will see your added container in the container list, where you can view its details.
By adding container details within the ERM system, you can effectively manage your container inventory, track their usage, and optimize logistics processes.
¶ Add Vessel
Vessel Management: This feature focuses on managing vessels such as ships, boats, or other watercraft. It could involve:
¶ Vessel Detail:
This refers to fundamental information about the vessel itself.
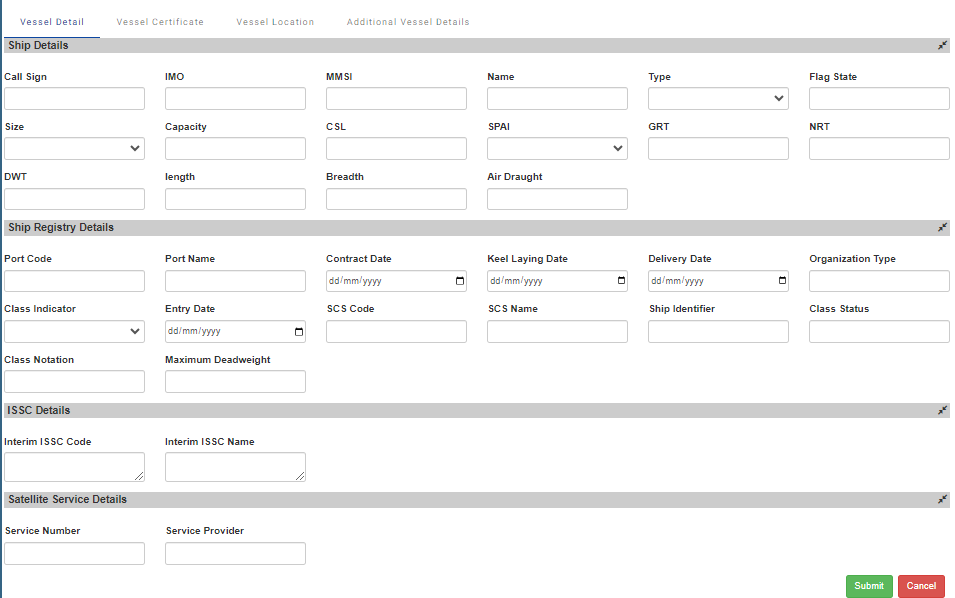
¶ Ship Details
- Unique Identifier to Vessel Call Sign: A globally unique signal identifier used during radio communications.
- International Maritime Organization (IMO) Ship Number: A unique seven-digit number assigned to seafaring ships for identification purposes.
- Ship Station Identity (MMSI): A nine-digit number identifying a ship's radio station, used in maritime digital communication.
- Vessel Name: The official name of the ship as registered.
- Vessel Type: The classification of the ship based on its design and primary function (e.g., tanker, cargo, passenger).
- Nationality of the Vessel (Flag State): The country under whose laws the vessel is registered or licensed.
- Vessel Size: The overall dimensions or measurements of the ship
- Capacity in TEUs: The number of Twenty-foot Equivalent Units (standard containers) that the vessel can carry.
- Gross Register Tonnage (in Mtrs): A measure of the ship's overall internal volume, with one tonnage equivalent to 100 cubic feet
- Net Register Tonnage (in Mtrs): Measures the usable volume of a ship (volume of cargo spaces) excluding machinery, crew quarters, etc.
- Deadweight Tonnage (in Pounds): The total weight a ship can safely carry, including cargo, fuel, passengers, crew, etc.
- Maximum Length of a Vessel: The longest dimensional measurement of the ship from the bow to the stern.
- Maximum Breadth: The widest point of the ship measured at the widest part.
- Height of Vessel (Air Draught): The vertical distance from the waterline to the highest point of the ship, important for determining if a vessel can pass under bridges.
¶ Ship Registry Details
- Port Code of Registry: The vertical distance from the waterline to the highest point of the ship, important for determining if a vessel can pass under bridges.
- Port Name of Registry: The name of the port where the ship is registered.
- Ship Building Contract Date: The date the contract was signed for the ship's construction.
- Ship Keel Laying Date: The date on which the keel was laid, marking the start of construction.
- Ship Delivery Date: The date the completed ship was delivered from the shipbuilder to the owner.
- Ship Responsibility Organization Type: The type of organization responsible for the ship's management and operations.
¶ ISSC (International Ship Security Certificate) Details
- Interim ISSC Code or Reason why ship has no valid ISSC: A code provided if the ship has an interim ISSC.
- Interim ISSC Name or Reason why ship has no valid ISSC:The name associated with the ISSC.
¶ Satellite Service Details
- Mobile Satellite Service Call Number: The call number for accessing satellite services from the ship.
- Mobile Satellite Service Provider: The company providing satellite communication services to the vessel.
¶ Vessel Certificate:
This involves managing the various certificates and documents required for the vessel's operation and compliance with regulations.
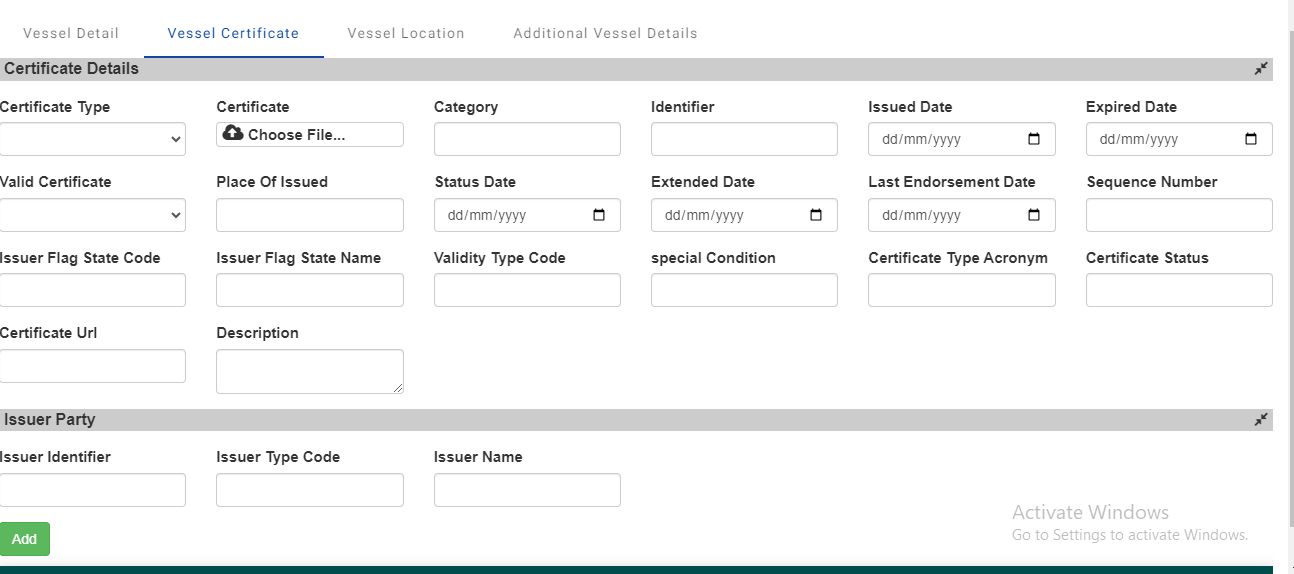
¶ Certificate Details
- Certificate Type: The category or kind of certificate.
- Certificate Image: Upload field for a scanned image or digital copy of the certificate.
- Certificate Category: General classification of the certificate (e.g., Compliance, Operational).
- Certificate Identifier: A unique ID number or code assigned to the certificate.
- Issued Date: Date on which the certificate was issued (format: dd/mm/yyyy).
- Expired Date: Expiry date of the certificate (format: dd/mm/yyyy).
- Valid Certificate: Indicator (Yes/No) whether the certificate is currently valid.
- Place Of Issued: The geographical location where the certificate was issued.
- Status Date: The date on which the current status was last confirmed (format: dd/mm/yyyy).
- Extended Date: Date until which the certificate has been extended, if applicable (format: dd/mm/yyyy).
- Last Endorsement Date: The date of the last endorsement or update made to the certificate (format: dd/mm/yyyy).
- Sequence Number: The sequence number of the certificate if part of a series.
- Issuer Flag State Code: The code representing the state under whose authority the certificate was issued.
- Issuer Flag State Name: The name of the state under whose authority the certificate was issued.
- Validity Type Code: A code indicating the type of validity (e.g., permanent, temporary, conditional).
- Special Condition: Any special conditions or remarks associated with the certificate.
- Certificate Type Acronym: An abbreviated form of the certificate type.
- Certificate Status: Current status of the certificate (e.g., Active, Expired, Suspended).
- Certificate URL: Web link to the digital version of the certificate, if available.
- Description: A brief description or additional details about the certificate.
¶ Issuer Information
- Issuer Identifier: Unique ID or code for the party or authority that issued the certificate.
- Issuer Type Code: Code representing the type of issuer (e.g., government, private, international organization).
- Issuer Name: The name of the issuer party or authority.
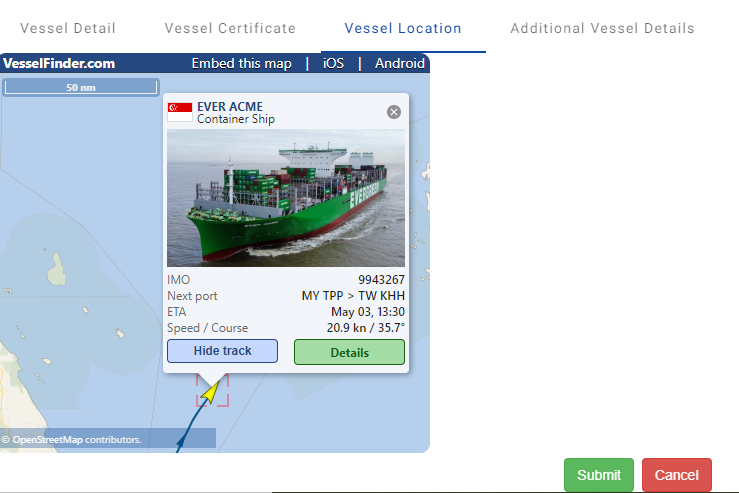
¶ Vessel Location:
This feature tracks the real-time location of the vessel. At the time of filling up the details in the vessel details form, if you filled in the input fields for Call Sign, IMO, and MMSI properly, then the Vessel Location map will automatically appear here.
¶ Additional Vessel Details:
The additional vessel details include information such as the vessel's building place and year, an image of the vessel, capacities of cranes and grabs, numbers of hatches, hooks, cranes, and grabs, as well as technical specifications like the Length Between Perpendicular (LBP) and Maximum Maneuvering Speed (Max. MS). These details offer a comprehensive overview of the vessel's construction, equipment, and capabilities.
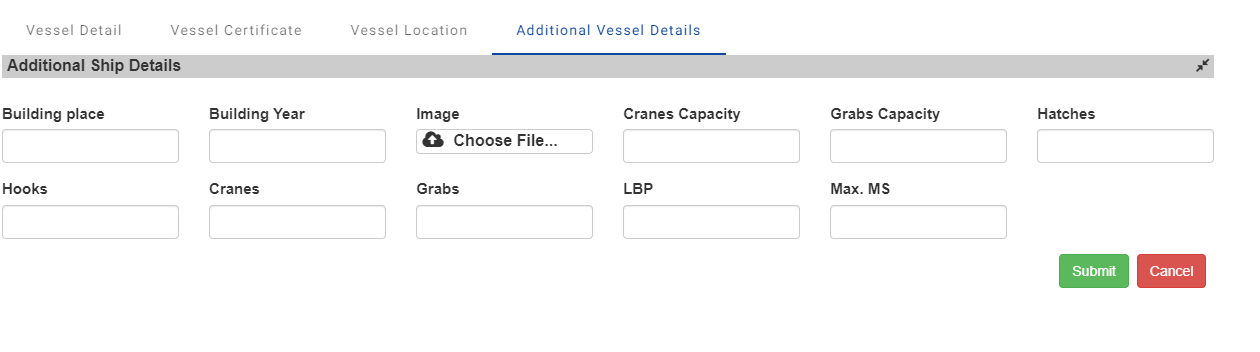
Additional Ship Details
- Vessel Building Place: The location where the ship was constructed.
- Building Year: The year in which the ship was built.
- Vessel Image: An image or picture of the vessel.
- Cranes Capacity: The maximum weight that the cranes on the ship can lift.
- Grabs Capacity: The maximum capacity of the grabs, which are used for lifting bulk cargo.
- Number of Hatches: The total number of openings on the ship's deck for loading and unloading cargo.
- Number of Hooks: The number of hooks available for lifting cargo.
- Number of Cranes: The total number of cranes installed on the ship.
- Number of Grabs: The total number of grabs (mechanical devices used for handling bulk cargo) on the ship.
- Length Between Perpendicular (LBP): The distance between the forward and after perpendiculars of the ship, usually measured along the summer load waterline.
- Maximum Maneuvering Speed (Max. MS): The highest speed at which the ship can safely and efficiently maneuver, often expressed in knots (nautical miles per hour).
Once all details are entered accurately, click on the "Submit" or "Save" button to save the vessel information in the system.
After successfully adding the vessel, you will see your added vessel in the vessel list, where you can view its details.